Upgrading or replacing a kitchen faucet is a practical home improvement project that can improve both functionality and aesthetics. A new faucet can modernize the look of your kitchen, provide better water flow, and even add features like a pull-down sprayer or touchless operation. While the installation process might seem intimidating, many homeowners can complete it with basic tools and some patience. Proper preparation, understanding the steps involved, and knowing when to call a professional can make the job smoother. Whether you’re swapping out an old faucet or installing one for the first time, this guide will help you through the process.
Choosing the Right Faucet
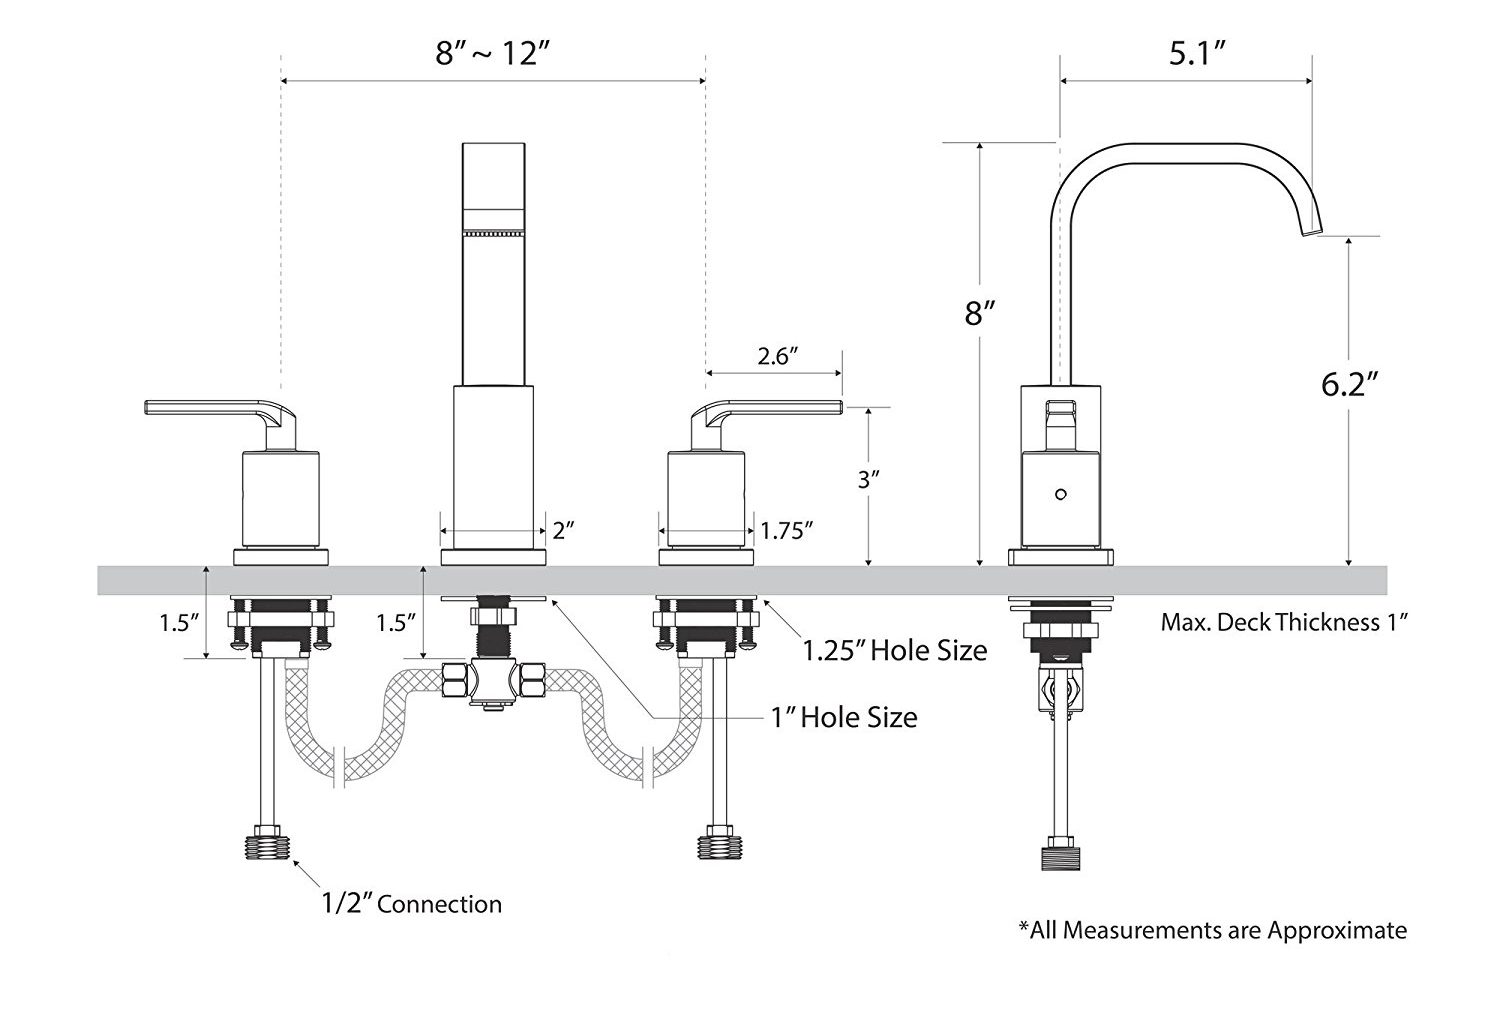
Before installation, selecting the right faucet is crucial. Consider the sink’s configuration, such as the number of holes and spacing, to ensure compatibility. Faucets come in various styles, including single-handle, double-handle, pull-down, and commercial-grade designs, each offering different benefits. Measure the sink’s existing setup or check the manufacturer’s specifications if it’s a new sink to avoid fit issues.
Material and finish also matter for durability and style. Stainless steel and brass faucets resist corrosion, while finishes like chrome, brushed nickel, or matte black can match your kitchen décor. Look for features like ceramic disc valves, which prevent leaks and extend the faucet’s lifespan. Water-saving models with aerators can reduce usage without sacrificing pressure, making them an eco-friendly choice.
Budget is another factor—basic faucets start at around $50, while high-end models with advanced features can cost several hundred dollars. Investing in a quality faucet ensures better performance and fewer repairs down the line. Reading reviews and checking warranty coverage can help narrow down the best option for your needs.
Gathering Tools and Materials
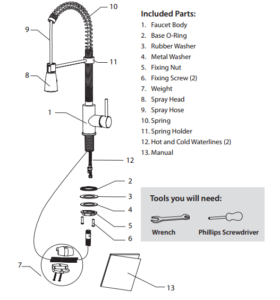
Having the right tools before starting the installation saves time and frustration. Essential items include an adjustable wrench, basin wrench, plumber’s putty, Teflon tape, and a bucket or towels to catch water. A flashlight or work light helps improve visibility under the sink, where space is often tight. If the new faucet includes a sprayer or soap dispenser, ensure all parts are included before beginning.
Shut off the water supply before disconnecting the old faucet. Most sinks have shutoff valves under the cabinet; if not, you may need to turn off the main water supply. Release any remaining water pressure by turning on the old faucet before removal. Disconnect the supply lines carefully, as older connections may be corroded or stiff, requiring extra effort or penetrating oil.
Inspect the sink area for any debris or old putty that needs cleaning before installing the new faucet. A clean, dry surface ensures a proper seal. If the new faucet has different hole requirements, use a template or measure carefully to avoid misalignment. Having all tools and parts ready streamlines the process and prevents mid-project delays.
Removing the Old Faucet
Start by disconnecting the water supply lines from the shutoff valves using an adjustable wrench. If the connections are stubborn, a basin wrench provides better leverage in tight spaces. Once the lines are detached, check for any residual water and place a towel or bucket underneath to catch drips. Next, locate the mounting nuts securing the faucet to the sink—these are often found underneath, holding the faucet in place.
Use a basin wrench or a socket set to loosen and remove the mounting nuts. Some faucets have plastic retaining clips instead of nuts, which can be pried off with a flathead screwdriver. Once all fasteners are removed, lift the old faucet from the sink. Clean the area thoroughly, removing old plumber’s putty or caulk with a putty knife. This ensures a smooth surface for the new installation.
If the old faucet had a separate sprayer or soap dispenser, remove those as well. Check for any damage or wear on the sink’s surface, especially around the holes. If necessary, apply a mild cleaner to remove mineral deposits or grime. Proper cleanup now prevents leaks or alignment issues later.
Installing the New Faucet
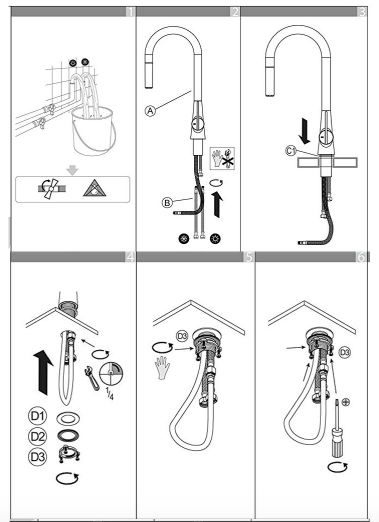
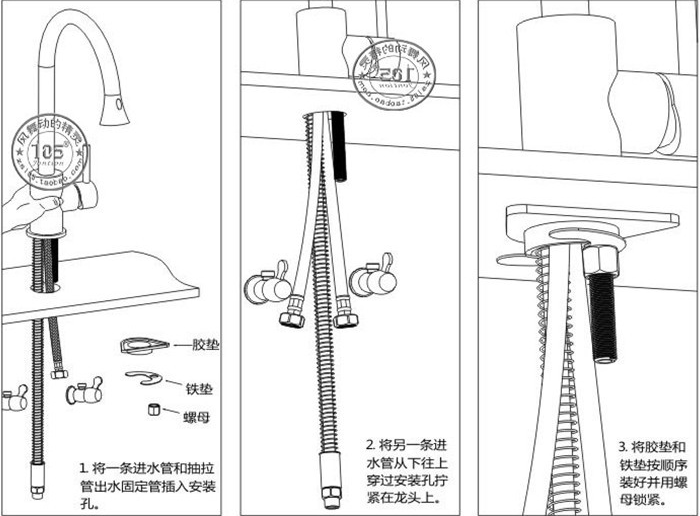
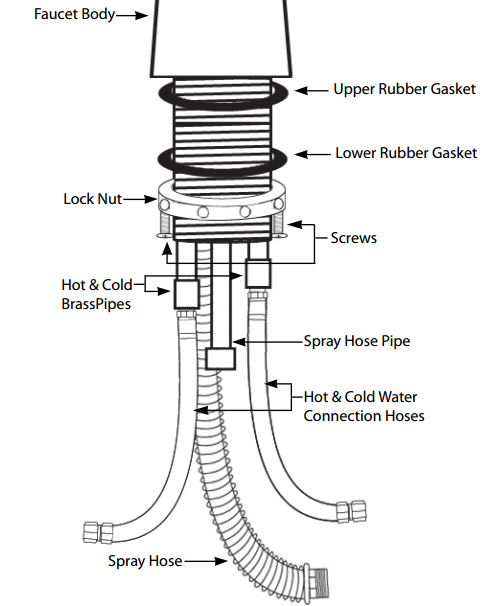
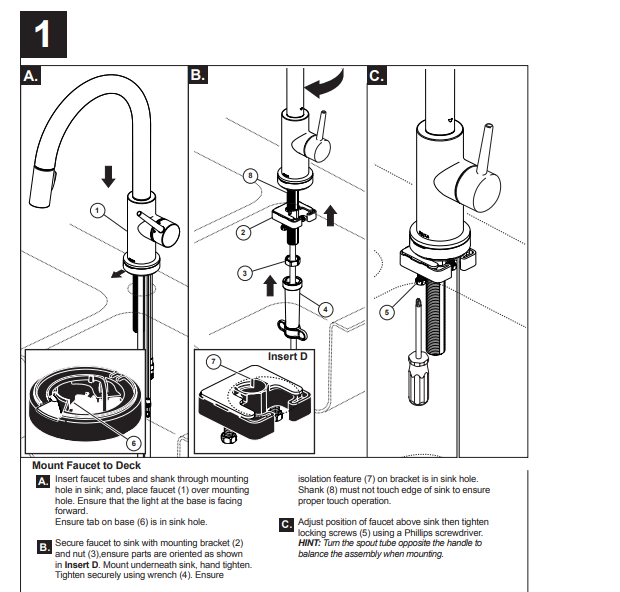
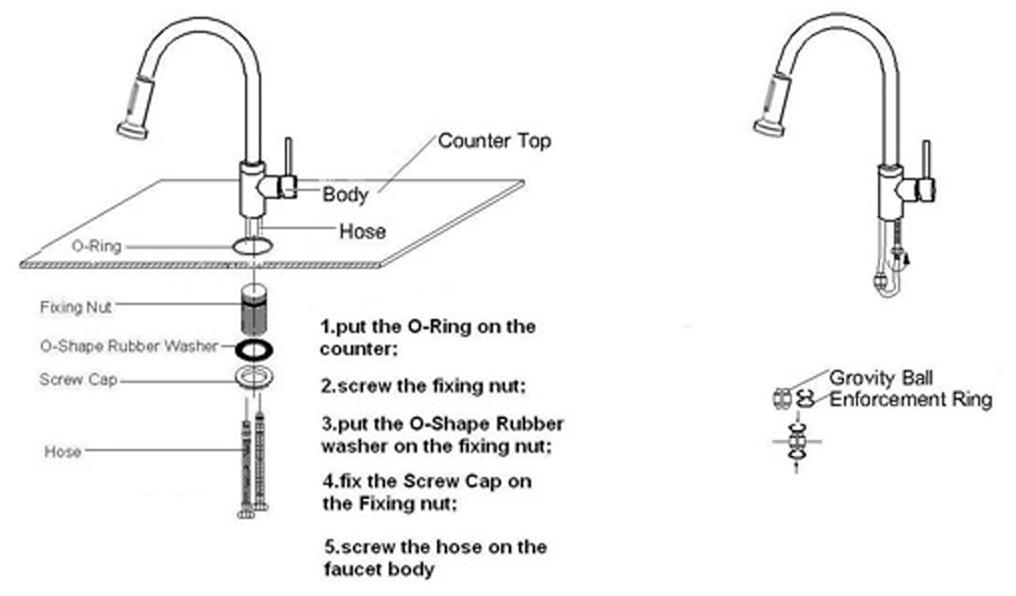
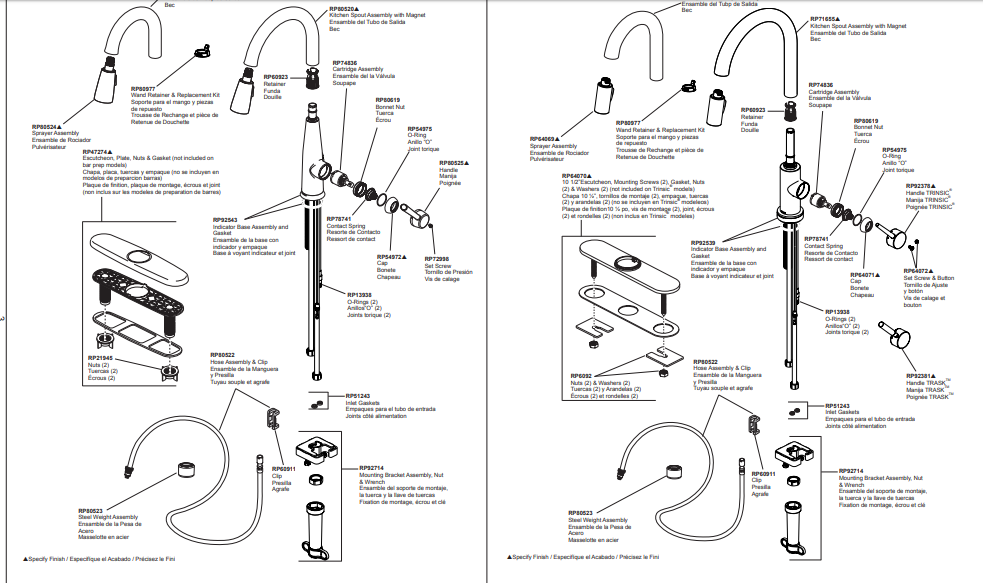
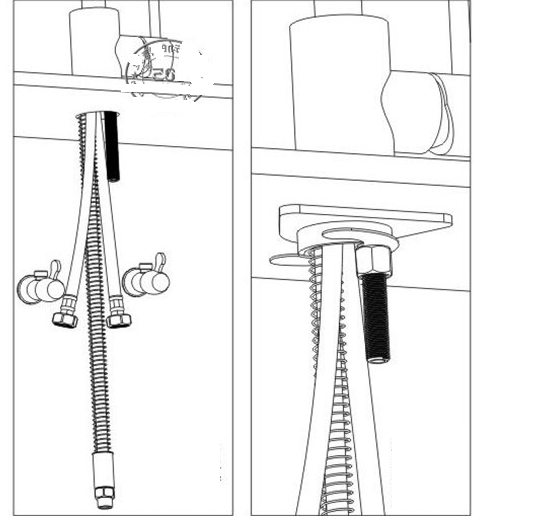
Begin by inserting the new faucet’s mounting hardware through the sink holes. If the faucet requires plumber’s putty, roll a small amount into a rope and place it around the base before setting it in position. This creates a watertight seal. For gasket-sealed faucets, ensure the rubber gasket is properly aligned before tightening. From underneath, attach the provided washers and mounting nuts, hand-tightening first before using a wrench for a secure fit.
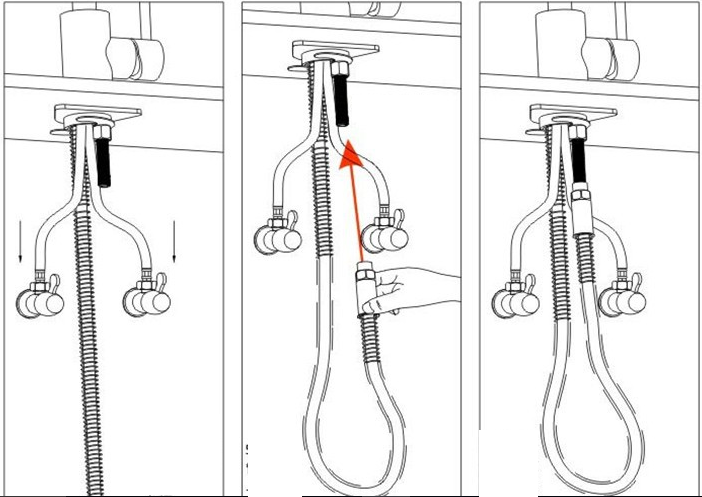
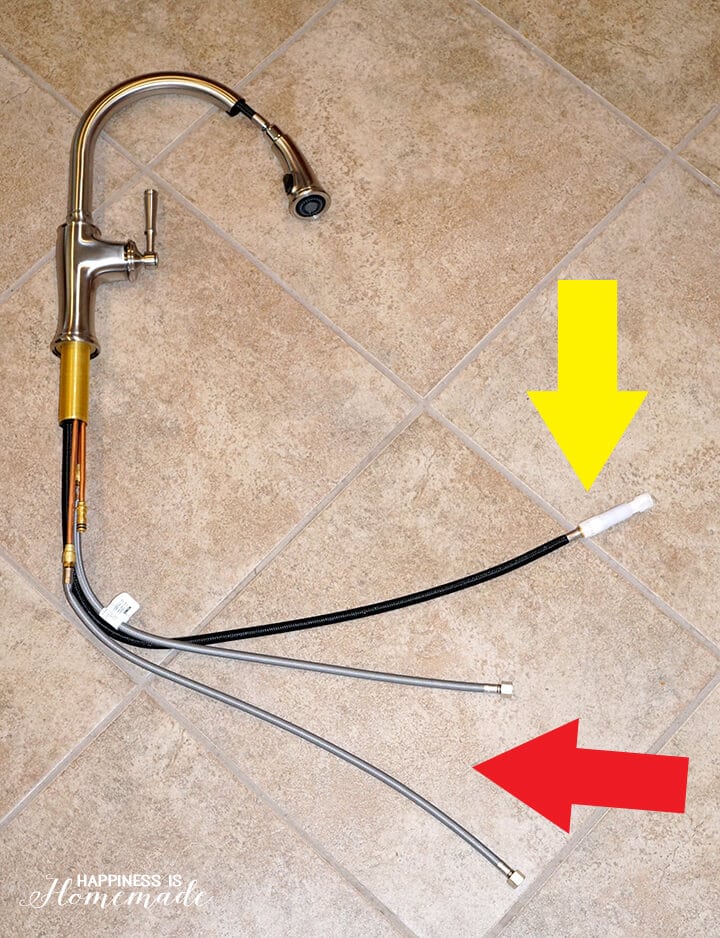
Reconnect the water supply lines, using Teflon tape on the threads to prevent leaks. Tighten the connections snugly but avoid over-tightening, which can damage the fittings. If the faucet includes a sprayer or additional accessories, follow the manufacturer’s instructions for attaching hoses and mounting hardware. Double-check all connections before turning the water back on.
Once everything is secured, turn the water supply valves back on slowly to avoid sudden pressure surges. Test the faucet for leaks by running both hot and cold water, checking underneath for any drips. If leaks appear, tighten the connections slightly or reapply Teflon tape. Finally, flush the faucet for a few minutes to clear any debris from the lines.
Testing and Troubleshooting
After installation, thoroughly test the faucet’s operation. Check for smooth handle movement, consistent water flow, and proper sprayer function if applicable. Listen for unusual noises like knocking or whistling, which may indicate water pressure issues or loose parts. Inspect all connections under the sink with the water running to confirm there are no leaks.
If the faucet drips after turning off, the issue may be with the cartridge or valves. Some models allow for easy cartridge replacement—consult the manual for guidance. Low water pressure could result from clogged aerators; unscrew the tip and clean it to restore flow. For persistent leaks or malfunctions, verify that all parts were installed correctly or contact the manufacturer for support.
Regular maintenance, such as cleaning aerators and checking for mineral buildup, keeps the faucet functioning well. Avoid harsh chemicals that can damage finishes, and promptly address any leaks to prevent water damage. With proper care, a well-installed kitchen faucet should provide reliable performance for years.
When to Call a Professional
While many faucet installations are DIY-friendly, some situations require professional help. If the shutoff valves are corroded or leaking, a plumber should replace them to prevent further issues. Homes with old or complex plumbing systems may also need expert attention to avoid unexpected complications. Additionally, if the sink or countertop requires modifications to fit the new faucet, a professional ensures proper cutting and sealing.
If you encounter stripped bolts, broken pipes, or persistent leaks despite proper installation, it’s best to call a plumber. They have specialized tools and expertise to resolve these issues safely. For high-end or touchless faucets requiring electrical connections for sensors, hiring a professional ensures correct wiring and compliance with local codes.
Investing in professional installation guarantees the job is done right, especially if you’re unsure about any steps. Many plumbers offer warranties on their work, providing peace of mind. Knowing when to DIY and when to call an expert can save time, money, and potential headaches in the long run.
Installation Instructions for Fontana Mora Kitchen Sink Faucet
Installation Instructions Venice Single Handle Pull Down Kitchen
How to Install Dual Handle Stainless Steel Bathroom and Kitchen
How to Install Abrantes Kitchen Sink Faucet with Pull Out Sprayer
Installation Instructions for Modena LED Kitchen Faucet Modena
How to Replace a Kitchen Faucet

D. Martel Plumbing Sink/Faucet Repair u0026 Installation 916-933-6363
How to Install a Kitchen Faucet – Happiness is Homemade
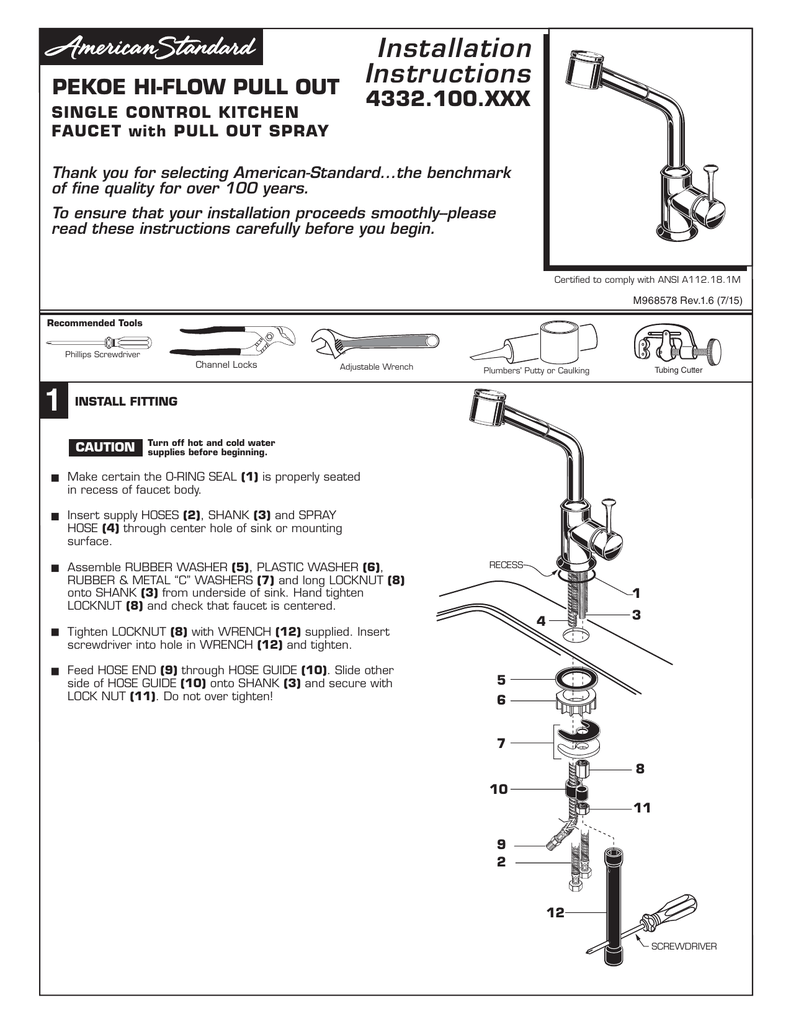
Installation Instructions PEKOE HI-FLOW PULL OUT 4332.100.XXX
Related Posts: