When I started my kitchen renovation two years ago, I knew I wanted something unique that would give my space character without breaking the bank. After researching granite, quartz, and butcher block, I stumbled upon concrete countertops and fell in love with their industrial charm and endless customization possibilities. The rustic concrete looked perfectly matched to my farmhouse aesthetic while offering durability I could count on. Let me share my journey from mixing my first batch to living with these beautiful, functional surfaces every single day.
Planning and Designing Your Concrete Countertop Layout
Planning my concrete countertop layout required more thought than I initially expected, especially considering the unique properties of working with concrete. I learned that concrete works best in sections rather than trying to create one massive continuous pour. My kitchen island became a single piece, while I divided the perimeter counters into three manageable sections based on natural break points like the sink and cooktop areas.
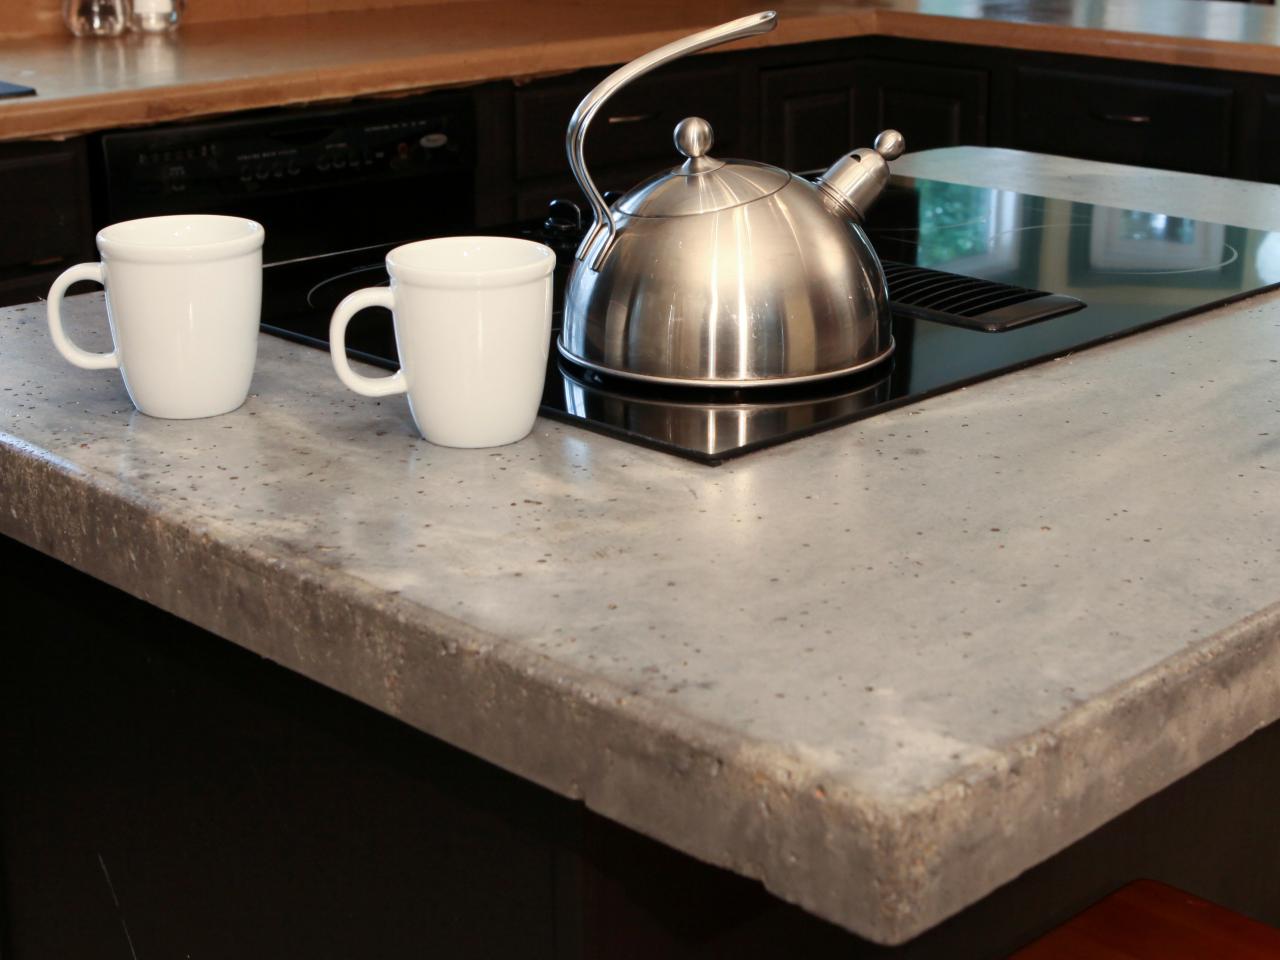
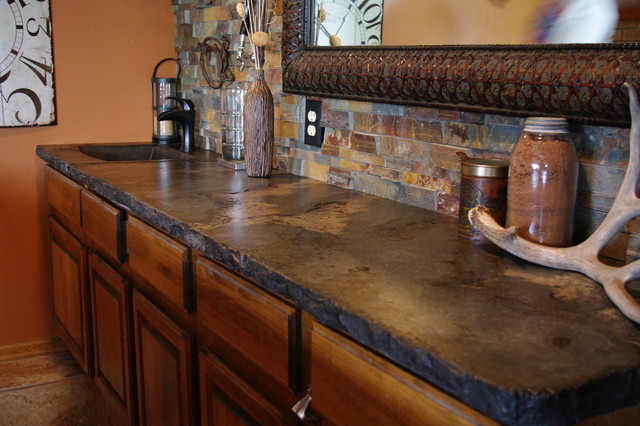
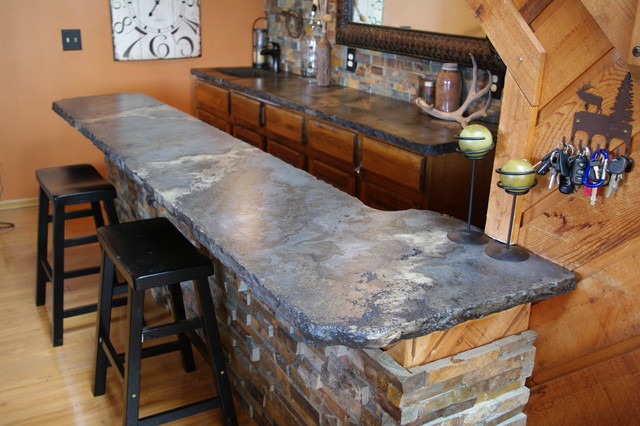
The thickness decision significantly impacted both appearance and functionality. I chose 2-inch thick counters that provided substantial visual weight, perfect for the rustic aesthetic, while remaining manageable for DIY installation. Thicker sections around the sink and cooktop areas gave additional support where needed most. The edge profiles became crucial design elements, with slightly rounded edges softening the industrial feel.
Template creation using melamine boards helped me visualize the final layout and identify potential problems before mixing concrete. I cut exact templates for each section, including sink and appliance cutouts, which served as both design tools and actual forms during pouring. This preparation phase took several weekends but prevented costly mistakes and ensured professional-looking results throughout my kitchen.
Mixing and Pouring Techniques for Rustic Texture
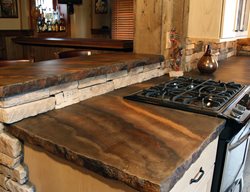
Creating the perfect rustic concrete mix became my biggest learning curve, requiring several test batches before achieving the look I wanted. I used a high-quality concrete countertop mix enhanced with fiber reinforcement for strength and durability. Adding natural aggregates like small river rocks and colored glass pieces created the rustic texture and visual interest that made each section unique and compelling.
The mixing process demanded patience and attention to detail, which I hadn’t anticipated. I learned to add water gradually while monitoring consistency, aiming for a mixture that held together without being too wet or sticky. Hand mixing smaller batches gave me better control over texture and prevented the mechanical mixing marks that can create unwanted patterns in the finished surface.
Pouring and vibrating techniques proved crucial for eliminating air bubbles while maintaining the rustic character I was seeking. I used a palm sander against the form sides to bring bubbles to the surface while being careful not to over-vibrate and lose the natural texture variations. Working methodically in small sections ensured consistent results while allowing me to manage the process without rushing through critical steps.

Creating Natural Color Variations and Weathered Appearance
Achieving authentic rustic coloring in my concrete countertops required layering different techniques to create depth and character. I started with integral color mixed directly into the concrete, choosing warm gray tones that would serve as the base. Additional color layers applied during finishing created the weathered, aged appearance that made my counters look like they had been in the kitchen for decades.
Acid staining became my secret weapon for creating natural-looking variations and patina effects. I applied different concentrations of acid stain in random patterns after the concrete had cured, allowing the chemical reactions to create organic color transitions. The unpredictable nature of acid staining perfectly matched the rustic aesthetic, with each section developing its own unique character and personality.
Hand-applied pigments and antiquing glazes provided the finishing touches that really brought the rustic look together. I used dry brushing techniques with darker colors to emphasize texture and create subtle shadows in the concrete surface. These final details made the difference between concrete that looked obviously new and surfaces that appeared naturally aged and weathered through years of use.

Sealing and Protecting Your Investment
Choosing the right sealer for my rustic concrete countertops required balancing protection with maintaining the natural, matte appearance I wanted. I tested several options on sample pieces before settling on a penetrating sealer that soaked into the concrete rather than creating a surface film. This approach preserved the natural texture and appearance while providing essential protection against stains and moisture.
The application process demanded careful attention to ensure complete coverage without creating glossy spots that would look unnatural. I applied multiple thin coats with a foam brush, working in small sections and maintaining wet edges to prevent lap marks. The key was allowing proper curing time between coats while working in manageable sections that I could complete without rushing.
Maintenance sealing has become an annual ritual that keeps my counters looking beautiful and protected. I lightly sand any wear spots before applying a fresh coat of sealer, focusing on high-use areas around the sink and prep zones. This preventive maintenance takes only a weekend but ensures my counters continue performing well and looking authentic after years of daily use.

Essential Tools and Materials for DIY Success
Gathering the right tools for my concrete countertop project made the difference between frustration and success. A good mixer became essential for consistent results, though I learned that a powerful drill with a mixing paddle worked well for smaller batches. Quality trowels in various sizes helped me achieve different textures, while rubber floats provided smooth finishing where needed.
Form construction required precision tools and quality materials to ensure professional results. I used melamine-coated particleboard for smooth surfaces and constructed sturdy frames with 2×4 lumber. Proper bracing prevented bowing during pours, while high-quality caulk sealed joints to prevent leaks. These upfront investments in good forms paid off with surfaces that needed minimal grinding and polishing.
Safety equipment proved non-negotiable when working with concrete and sealers. I invested in a quality respirator, protective eyewear, and chemical-resistant gloves that allowed me to work safely with potentially harmful materials. Adequate ventilation in my workspace became crucial, especially during acid staining and sealing processes that involved strong chemical odors and fumes.
Living with Rustic Concrete Countertops Daily
Daily life with concrete countertops has exceeded my expectations in most ways while teaching me important lessons about maintenance and care. The rustic surface hides minor scratches and wear beautifully, actually improving in appearance as it develops natural patina over time. Hot pots and pans haven’t caused damage, though I use trivets out of habit to preserve the sealer.
Cleaning routines required some adjustment from my previous laminate counters, but nothing too demanding. I use pH-neutral cleaners and avoid acidic substances like lemon juice or vinegar that could etch the surface. Spills get wiped up promptly, and I’ve learned that most stains can be prevented with quick action and proper sealing maintenance.
The unique character of my concrete counters continues bringing me joy every time I work in the kitchen. Each section has its own personality with natural variations that catch light differently throughout the day. Friends and family always comment on their beauty and authenticity, making them a conversation starter that adds personality to my home while providing excellent functionality for serious cooking.

How much did your DIY concrete countertops cost compared to other materials?
My entire kitchen cost around $800 in materials for about 45 square feet of countertop. This included concrete mix, reinforcement, sealers, and all tools I didn’t already own. Comparable granite would have cost $3,500-4,000 installed. The time investment was significant, but the savings made it worthwhile for my budget.
How durable are concrete countertops for everyday kitchen use?
After two years of heavy use, mine still look great with proper maintenance. They handle hot pans, knife work, and daily cooking without issues. The rustic finish actually hides wear better than polished surfaces. Proper sealing and occasional maintenance keep them performing well, though they do require more care than granite.

Can concrete countertops crack, and what do you do if they do?
Minor hairline cracks can develop, especially in larger spans. I’ve had two small cracks that I filled with matching concrete paste and resealed. The rustic finish makes repairs nearly invisible. Proper reinforcement and realistic expansion joints prevent most cracking issues if planned correctly during installation.
How difficult is it to cut holes for sinks and appliances in concrete countertops?
I cut all openings before pouring using templates in my forms, which is much easier than cutting afterwards. Post-pour cutting requires diamond blades and creates lots of dust. Planning all openings during the form stage saves time and creates cleaner results. Template accuracy becomes crucial for a proper fit.

Do concrete countertops stain easily, and how do you prevent it?
Properly sealed concrete resists most stains well. I’ve had red wine and oil spills that cleaned up easily when wiped promptly. The key is maintaining the sealer and addressing spills quickly. The rustic finish helps camouflage minor staining that might be obvious on uniform surfaces like quartz or granite.
Would you choose concrete countertops again, knowing what you know now?
Absolutely! Despite the work involved, I love their unique character and functionality. The customization possibilities and cost savings made them perfect for my situation. However, they’re not maintenance-free like quartz, so consider your lifestyle and willingness to perform periodic sealing and care before deciding.

How to Build a Concrete Countertop
Wood Finish Concrete Countertops CHENG Concrete Exchange
Rustic DIY Concrete Counter Tops

Wood Look Concrete Countertops in the Kitchen – Concrete Decor
Rustic Outdoor Concrete Countertop Kitchen
Concrete Countertops Pictures – Gallery – Concrete Network
Rustic Concrete Countertop For Outdoor Kitchen
Related Posts: