When I purchased my 1958 ranch house, the kitchen cabinets were original but in rough shape, faded yellow laminate with broken hinges and water-damaged particle board interiors. I faced a choice: rip everything out for a modern kitchen or embrace the home’s vintage character with retro-inspired cabinets.
After months of research, hunting for materials, and working with contractors, I chose to celebrate the era rather than erase it. The process taught me about authentic mid-century design, the difference between vintage and reproduction materials, and how to balance period aesthetics with modern functionality. Let me share what I learned from this rewarding journey.
Understanding Authentic Mid-Century Cabinet Styles
My education in retro cabinet design began with studying original 1950s and ’60s kitchens. I pored over vintage home magazines, architectural archives, and restoration websites to understand what made these cabinets special. The era favored clean horizontal lines, flat-panel or simple slab doors, minimal ornamentation, and an emphasis on function. Cabinet makers used new materials like laminate and metal alongside traditional wood, creating fresh looks that felt modern and optimistic. Colors ranged from soft pastels to bold primaries, often combined with natural wood tones or crisp white.
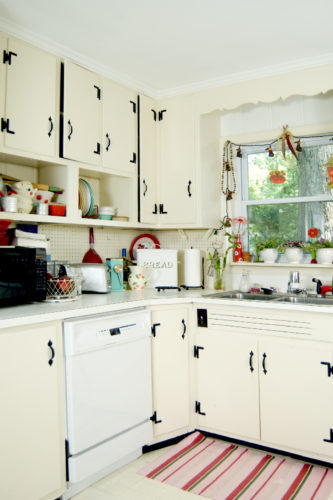
I discovered several distinct cabinet styles from the period. Steel cabinets with baked enamel finishes in cheerful colors dominated many 1950s kitchens, offering durability and easy maintenance. Wood cabinets in blonde birch or light oak represented another popular choice, sometimes with decorative details like atomic-era starburst patterns on door fronts. Two-tone cabinets mixing colors like turquoise uppers with yellow lowers created visual interest. I fell in love with the simple elegance of flat-panel doors and the way vintage kitchens used color fearlessly.
The hardware from this era deserves special attention because it defined much of the aesthetic. Chrome handles and pulls in streamlined shapes, Bakelite knobs in vibrant colors, and decorative backplates with atomic or boomerang designs appeared throughout the period.
I collected vintage hardware from estate sales and architectural salvage shops, studying the shapes and finishes that felt authentically retro. These small details would become crucial in making my new cabinets feel genuinely period-appropriate rather than vaguely vintage.

Deciding Between Restoration, Refacing, and New Construction
I spent weeks debating whether to restore my original cabinets or start fresh. The existing cabinet boxes were structurally sound steel units, but the laminate surfaces were badly damaged, and several doors were beyond repair. I consulted three different contractors about options. Restoration would involve extensive metalwork, new laminate, and fabricating replacement doors to match originals, an estimated $8,000-10,000 investment. Refacing with new doors and laminate veneers would cost $5,000-7,000 but wouldn’t address interior condition issues.
I ultimately decided on new custom cabinets built to replicate the original style. This choice cost more upfront, approximately $12,000 for my modest kitchen, but gave me the authentic look I wanted with modern construction quality. My cabinet maker studied my original units and created new ones with period-accurate proportions and details while using contemporary materials and techniques inside. The drawer boxes featured dovetail joinery and soft-close glides, luxuries the original cabinets never had. The exteriors perfectly captured 1950s aesthetics, while the interiors provided modern functionality.
For homeowners with better-condition original cabinets, restoration can absolutely be worthwhile. I’ve seen stunning transformations where professionals stripped and refinished vintage cabinets, replaced hardware, and modernized interiors while preserving authentic exteriors. If you have solid wood cabinets from the era in reasonable structural condition, restoration often makes more financial and historical sense than replacement. However, if your originals are damaged, poorly constructed, or non-functional, new cabinets built in a retro style might serve you better long-term.

Choosing Colors That Capture the Era
Selecting cabinet colors became one of my favorite parts of the project. Retro kitchens weren’t afraid of color, and I wanted to honor that boldness. I collected paint chips in authentic 1950s and 60s hues: soft mint, turquoise, butter yellow, coral pink, and seafoam green. I also considered classic combinations like white with wood accents or two-tone schemes mixing complementary colors. I tested multiple options by painting large poster boards and living with them in my kitchen for weeks, observing how they looked in different lighting throughout the day.
I chose a soft mint green for my lower cabinets and crisp white for the uppers, creating a classic two-tone look that felt authentically mid-century. The mint provided the cheerful color pop I craved without overwhelming my small kitchen. White uppers kept the space feeling bright and open while reflecting light from my window. I used a high-quality paint with a semi-gloss finish that mimicked vintage baked enamel cabinets. The slight sheen resisted fingerprints and wiped clean easily, proving that practical considerations could align with aesthetic goals.
My cabinet maker convinced me to use real paint rather than laminate for the color, arguing that paint offered a more authentic appearance and easier touch-ups if needed. We applied multiple coats with extensive sanding between each layer, then finished with a clear protective topcoat. The result looks remarkably like vintage painted metal cabinets, but with better durability. I’ve had these cabinets for eighteen months now, and the finish still looks perfect despite daily use. The color has held up beautifully without fading or yellowing, which was a concern I’d had about painted cabinets.

Selecting Hardware That Defines the Look
The hardware became my obsession during the cabinet planning phase. I knew that authentic-looking pulls, knobs, and hinges would make or break the retro aesthetic. I started collecting vintage hardware from estate sales and antique shops, finding chrome handles with streamlined designs and Bakelite knobs in cheerful colors. However, many vintage pieces showed wear or had damaged finishes that couldn’t be restored. I also discovered that vintage hardware often doesn’t meet current standards for weight capacity and durability.
I ultimately mixed vintage and reproduction hardware throughout my kitchen. For my upper cabinets, I used new reproduction chrome handles with the classic horizontal bar design popular in the 1950s. These cost about $8 each and came with proper mounting hardware and finishes that won’t corrode. For lower cabinet drawers, I installed authentic vintage chrome pulls I’d collected, about 30 pieces accumulated over six months of hunting. Each one was slightly different, adding character and authenticity. I cleaned and polished them carefully, and they looked stunning against the mint paint.
The knobs required special consideration because I wanted something distinctive. I found a supplier who makes reproduction Bakelite-style knobs in authentic 1950s colors. I chose turquoise knobs for my white upper cabinets and white knobs for my mint lowers, creating a subtle color reversal that tied the two-tone scheme together. Installing the hardware myself saved money and gave me control over placement. I created a template to ensure consistent positioning on every door and drawer. This attention to detail made the difference between cabinets that look vaguely retro and ones that genuinely capture the era’s spirit.

Incorporating Modern Functionality and Storage Solutions
While I wanted authentic retro aesthetics, I absolutely needed modern functionality. Vintage cabinets often lack the storage solutions we expect today, things like pull-out shelves, soft-close hinges, and organized drawer dividers. I worked with my cabinet maker to hide modern conveniences inside period-appropriate exteriors. The challenge was maintaining an authentic look while incorporating contemporary features that make daily life easier. This balance between form and function required thoughtful planning and occasional compromises.
I installed pull-out shelves in my lower cabinets, which didn’t exist in 1950s kitchens, but transformed my storage capacity. Deep base cabinets no longer require kneeling and digging to reach items in the back. Each shelf glides out smoothly on full-extension slides, bringing everything within easy reach. I added a pull-out spice rack beside my stove, a vertical organizer for baking sheets and cutting boards, and a pull-out trash bin that hides waste containers. These modern touches remained invisible when cabinets were closed, preserving the clean retro lines.
My drawer organization exceeded anything available in vintage kitchens. I installed custom dividers for utensils, a knife block drawer insert, and specialized compartments for different tools and gadgets. Soft-close drawer glides prevented slamming and protected both cabinets and contents. The upper cabinets received adjustable shelving so I could customize spacing for my needs. I added interior LED lighting that illuminates cabinet contents beautifully. All these modern features coexist happily with retro exteriors because I prioritized functionality from the planning stage rather than treating it as an afterthought.
Finishing Touches That Complete the Retro Kitchen
Once my cabinets were installed, I focused on details that reinforced the retro aesthetic throughout my kitchen. I replaced my old overhead fluorescent fixture with a vintage-inspired atomic-era chandelier featuring brass arms and frosted glass globes. The light fixture became an instant focal point and conversation piece. I added open shelving in one section, displaying vintage dishware, cookbooks with colorful covers, and small appliances in period-appropriate styles. These finishing touches transformed my cabinets from nice to authentically retro.
I carefully selected appliances that wouldn’t clash with my vintage cabinets. Finding truly retro-styled appliances proved challenging and expensive, so I compromised strategically. I splurged on a reproduction 1950s-style refrigerator in turquoise, which became the kitchen’s showpiece. For other appliances, I chose simple white models with clean lines that felt appropriately understated. My vintage-inspired oven has modern functionality inside a retro-styled exterior. The key was avoiding ultra-contemporary stainless steel and black appliances with digital displays that would have felt jarring against the period cabinets.
The countertops, backsplash, and flooring needed to support the retro theme. I chose butcher block countertops that were popular in mid-century kitchens and added warmth against my painted cabinets. My backsplash uses mint green subway tiles in a glossy finish that echoes the cabinet color. The floor features black and white checkered vinyl tile in a classic pattern that grounds the entire design. Every element works together to create a cohesive retro kitchen that feels intentional and authentic. The cabinets anchor everything, but all these supporting details ensure the aesthetic reads as genuinely mid-century rather than randomly vintage.

How much did your retro kitchen cabinets cost?
My custom cabinets, built to replicate 1950s style, cost $12,000 for a 10×12-foot kitchen with 18 linear feet of cabinetry. This included materials, construction, paint finish, and installation. Hardware added another $400, split between vintage and reproduction pieces. Semi-custom stock cabinets in retro styles start around $6,000-8,000 for similarly sized kitchens. If I’d restored my original cabinets, costs would have been $8,000-10,000. Fully custom cabinets from premium makers can reach $20,000-30,000. Refacing existing cabinets with retro-style doors offers a budget option at $4,000-6,000. My mid-range choice provided excellent quality and authenticity.
Are painted cabinets durable enough for daily kitchen use?
My painted cabinets have exceeded my durability expectations. The key is using high-quality paint, proper surface preparation, and a protective topcoat. My cabinet maker applied primer, multiple paint coats with sanding between each, and a clear conversion varnish topcoat that cures to an extremely hard finish. After eighteen months of daily cooking, the cabinets show no chips, scratches, or wear. The semi-gloss finish resists grease and wipes clean easily. I clean them weekly with mild soap and water. Touch-ups are simple if needed since I kept extra paint, though I haven’t needed it yet.

Can retro cabinets work in a small kitchen?
Absolutely, and my 10×12 kitchen proves it. Retro style actually works beautifully in compact spaces. The era emphasized efficiency and clever storage, perfect for small kitchens. Light colors like my white uppers and mint lowers keep the space feeling open and bright. Simple flat-panel doors without heavy molding or ornamentation prevent visual clutter. The horizontal lines of retro cabinets create a sense of width. I maximized function with modern interior storage solutions while maintaining streamlined retro exteriors. Small kitchens benefit from the clean, uncluttered aesthetic that defines mid-century design.
Where can I find authentic retro cabinet hardware?
I found vintage hardware through multiple sources over six months. Estate sales yielded my best finds, often entire sets from one kitchen at reasonable prices. Architectural salvage shops carry curated selections at higher prices but guaranteed quality. Online marketplaces like eBay and Etsy offer extensive options, though shipping costs add up, and you can’t inspectthe condition beforehand. Antique malls sometimes have dealers specializing in vintage hardware. For reproduction hardware, I used Rejuvenation, Schoolhouse Electric, and Retro Renovation’s recommended suppliers. These companies make faithful reproductions of 1950s and 60s designs with modern quality and finishes.
Should I match my cabinet style to my home’s original era?
Not necessarily, and personal preference matters most. My 1958 home-made retro cabinets are an obvious choice, but I’ve seen stunning retro kitchens in Victorian homes, 1980s builds, and modern new construction. The key is committing to the aesthetic and executing it well. If your home has strong architectural character from another era, you might want to honor that. However, kitchens are often separated from main living areas, giving you freedom to create a distinct style. I recommend choosing cabinets you genuinely love rather than feeling constrained by your home’s age. Good design transcends strict period matching.
How do I maintain the authentic look while adding modern appliances?
This balance requires strategic choices. I splurged on a retro-styled refrigerator that anchors my vintage aesthetic despite having modern features inside. For other appliances, I chose simple designs in white or colors that blend rather than contrast. I avoided stainless steel and black appliances with prominent digital displays. Panel-ready dishwashers that accept cabinet fronts provide seamless integration. Some people paint modern appliances or apply vinyl wraps in retro colors. The key is preventing appliances from dominating visually. Keep them understated and let your beautiful cabinets remain the focal point.

How to Find and Use Vintage Hardware for Your Kitchen

White Retro Kitchen Cabinets

How to Find and Use Vintage Hardware for Your Kitchen
Cabinet Hardware by House Style

Related Posts: